Starting an IV is the process of inserting a peripheral catheter into a vein to deliver fluids, medications, or nutrients directly into the bloodstream. This clinical skill requires specific equipment, proper technique, and trained hands to perform safely.
This guide covers IV equipment and catheter selection, patient preparation and vein assessment, the step-by-step insertion process, anatomical site options, difficult-access strategies, common mistakes and complications, professional qualifications, and ongoing line maintenance.
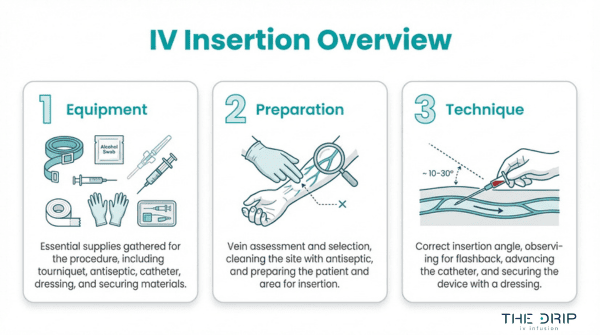
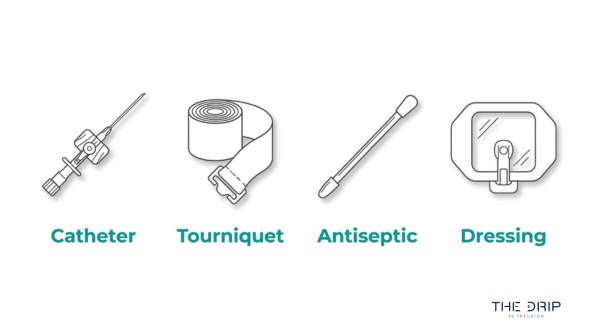
Successful IV access begins with assembling the right supplies. A standard start kit includes an antiseptic applicator, transparent dressing, tourniquet, gauze, and tape; catheter gauge ranges from 14 (for trauma resuscitation) down to 24 (for neonates), with the smallest effective size recommended to minimize vein irritation.
Before insertion, clinicians verify the provider order, assess vein quality through palpation, and position the patient’s arm below heart level to encourage venous filling. The insertion sequence itself follows a precise order: tourniquet application, vein selection, site cleaning with chlorhexidine that must dry for at least 30 seconds, catheter entry at 10 to 30 degrees bevel-up, flashback confirmation, catheter advancement, securement, and drip rate calculation.
Vein choice depends on therapy duration and patient anatomy. The median cubital vein offers reliable short-term access, while forearm veins provide stability for extended infusions. For patients with difficult access due to dehydration, obesity, or fragile vasculature, warm compresses promote dilation and ultrasound guidance achieves success rates above 80% after failed traditional attempts.
Complications including phlebitis, infiltration, infection, and air embolism each require specific recognition and response protocols. Only licensed professionals, primarily registered nurses, paramedics, and certain LPNs, are authorized to perform IV insertion, with scope of practice varying by state.
What Equipment Do You Need to Start an IV?
The equipment needed to start an IV includes a peripheral IV start kit, the correct catheter gauge, and the appropriate IV fluid. Each component plays a specific role in safe, effective venous access.
What Are the Essential Supplies in an IV Start Kit?
The essential supplies in an IV start kit are the pre-assembled components required for safe peripheral venous access. According to Medline Industries, the standard peripheral IV start kit typically includes a 2% chlorhexidine gluconate (CHG) and 70% isopropyl alcohol antiseptic applicator, a transparent semipermeable dressing, a tourniquet, 2×2 inch gauze pads, medical tape, and a patient identification label.
Having these items pre-packaged in a single kit reduces preparation time and minimizes the risk of missing a critical supply during insertion. For practitioners who perform IV starts regularly, confirming kit completeness before approaching the patient is a simple habit that prevents unnecessary delays.
How Do You Choose the Right IV Catheter Gauge?
You choose the right IV catheter gauge by matching the catheter size to the prescribed therapy, the patient’s vein condition, and the required flow rate. Clinical guidelines recommend selecting the smallest gauge peripheral catheter that will accommodate the prescribed therapy and patient needs to minimize vein irritation, according to Pedagogy Education. Larger gauges deliver higher flow rates but carry greater risk of vein damage, while smaller gauges are gentler on fragile vasculature.
14-Gauge Catheter
A 14-gauge catheter is the largest peripheral catheter commonly used in clinical settings. Capable of delivering approximately 240 mL/min, it is primarily indicated for trauma resuscitation and massive fluid replacement where rapid volume delivery is critical. This gauge is rarely needed outside emergency scenarios.
16-Gauge Catheter
A 16-gauge catheter provides high-volume flow suitable for surgical patients and blood transfusions. While slightly smaller than a 14-gauge, it still supports rapid infusion rates. Clinicians typically reserve this size for operating rooms and acute care settings where moderate to large fluid volumes are anticipated.
18-Gauge Catheter
An 18-gauge catheter is the most versatile size for general adult IV therapy. It accommodates blood products, CT contrast media, and standard fluid administration effectively. Most adult patients with adequate vein size tolerate this gauge well, making it a reliable default choice for routine infusions.
20-Gauge Catheter
A 20-gauge catheter balances adequate flow with patient comfort. It suits most standard infusions, medications, and hydration therapy in adult patients. When vein size is moderate or the prescribed therapy does not require high flow rates, a 20-gauge is often the most practical selection.
22-Gauge Catheter
A 22-gauge catheter is clinically preferred for elderly and pediatric patients requiring slower infusions. Designed for a flow rate of 35 mL/min, this smaller gauge reduces vein irritation in patients with fragile vasculature. Its gentler profile makes it well suited for extended therapy in populations where vein preservation is a priority.
24-Gauge Catheter
A 24-gauge catheter is the smallest standard peripheral catheter used in clinical practice. It is reserved for neonates, very small pediatric patients, and adults with extremely fragile or limited venous access. Flow rates are restricted, so this gauge works best for slow medication delivery rather than rapid fluid resuscitation.
What Type of IV Fluids Are Used for Infusion?
The types of IV fluids used for infusion are crystalloid solutions and colloid solutions, with crystalloids being the most commonly administered. According to StatPearls (National Center for Biotechnology Information), crystalloid solutions are categorized by their relative tonicity to plasma as isotonic, hypotonic, or hypertonic, and are the most commonly used fluids for replacement due to availability and low cost.
The three primary crystalloid categories include:
- Isotonic solutions (250–375 mOsm/L), such as 0.9% Normal Saline and Lactated Ringer’s, remain in the extracellular compartment and treat fluid volume deficits.
- Hypotonic solutions (less than 250 mOsm/L) shift fluid into cells and are indicated for intracellular dehydration and hypernatremia.
- Hypertonic solutions (greater than 375 mOsm/L) pull fluid from cells into the intravascular space and treat severe hyponatremia and cerebral edema.
Provider order verification must confirm the type of solution, rate of infusion, and duration of therapy before any fluid is connected. Matching the correct fluid to the clinical indication is just as important as selecting the right catheter; an inappropriate solution can worsen the very imbalance it was meant to correct.
With the right equipment assembled, proper patient preparation becomes the next critical step before insertion.
How Do You Prepare a Patient Before Starting an IV?
You prepare a patient before starting an IV by assessing vein quality, verifying the provider order, and positioning the patient correctly. These three steps reduce complications and improve first-attempt success.
How Do You Assess a Patient’s Veins Before Insertion?
You assess a patient’s veins before insertion by visually inspecting and palpating the upper extremities for size, resilience, and accessibility. Start at the dorsal hand veins and work proximally toward the forearm and antecubital fossa. A suitable vein feels bouncy and refills quickly after compression.
Factors that complicate vein assessment include dehydration, obesity, and prior IV therapy. Applying a tourniquet three to four inches above the intended site engorges the veins, making them easier to evaluate. If veins remain difficult to locate, warming the area with a compress promotes venous dilation.
For patients with a history of multiple failed attempts, this initial assessment determines whether standard palpation will suffice or advanced tools are necessary.
What Steps Should You Take to Verify the Provider Order?
The steps you should take to verify the provider order include confirming the patient’s identity, the prescribed solution type, the infusion rate, and the therapy duration. According to the Merck Manuals, provider order verification is a critical pre-insertion requirement that must include the type of solution, rate of infusion, and duration of therapy.
Cross-check the order against the patient’s allergy history and current medications before gathering supplies. Any discrepancy between the written order and the patient’s clinical status requires clarification with the prescribing provider before proceeding. Skipping this step is one of the most preventable causes of IV-related adverse events.
How Do You Position the Patient for IV Access?
You position the patient for IV access by placing them in a comfortable, supported position with the selected arm extended and slightly below heart level. This encourages venous filling by gravity and stabilizes the limb during catheter insertion.
For patients with difficult intravenous access, ultrasound-guided techniques have demonstrated an 80.95% success rate after multiple failed traditional attempts, according to a study published in BMJ Open Quality. Proper positioning also matters during emergencies; if an air embolism occurs, Durant’s maneuver requires placing the patient in the left lateral decubitus and Trendelenburg position to trap air in the right atrium and ventricle, minimizing entry into the pulmonary circulation.
With the patient properly prepared, the next step involves selecting the best vein and performing the actual insertion.
What Are the Steps to Start an IV Successfully?
The steps to start an IV successfully follow a precise sequence: tourniquet application, vein selection, site cleaning, catheter insertion, flashback confirmation, catheter advancement, securement, and drip rate setting.
How Do You Apply the Tourniquet Correctly?
You apply the tourniquet correctly by placing it 3 to 4 inches above the intended insertion site and tightening it enough to restrict venous flow without cutting off arterial circulation. The tourniquet should feel snug, and you should still be able to palpate a distal pulse. Flat latex or disposable tourniquets work best for most adults. Leave it in place no longer than one to two minutes to avoid discomfort and hemoconcentration. If veins do not distend within that window, release the tourniquet briefly, reposition, and reapply. Proper tourniquet technique is the single most controllable factor in making veins accessible for cannulation.
How Do You Select the Best Vein for IV Insertion?
You select the best vein for IV insertion by palpating for a vessel that feels bouncy, resilient, and well-anchored beneath the skin. Ideal veins are straight, visible or easily palpable, and located on the dorsal hand or forearm. Avoid veins near joints, previously punctured sites, or areas with bruising and scarring.
Key vein selection criteria include:
- The vein rebounds when gently pressed and released.
- The vessel runs in a straight segment long enough to accommodate the catheter length.
- The surrounding tissue is free from edema, infection, or prior infiltration.
- The nondominant arm is used when possible to preserve patient comfort.
How Do You Clean and Prep the Insertion Site?
You clean and prep the insertion site by applying an antiseptic agent in a circular motion, starting at the puncture point and working outward. According to CPR123, site preparation requires 2% chlorhexidine in 70% alcohol, which must dry completely for at least 30 seconds before needle insertion. This drying time is essential because inserting through a wet antiseptic can introduce chemical irritation into the vein and compromise the antimicrobial effect. Avoid fanning or blowing on the site; let it air dry naturally. Once prepped, do not re-palpate the vein unless you repeat the entire cleaning process.
How Do You Insert the IV Catheter at the Right Angle?
You insert the IV catheter at the right angle by stabilizing the vein with traction from your nondominant hand and approaching with the bevel facing up. According to the Merck Manuals, the recommended catheter insertion angle for peripheral IV access is between 10 and 30 degrees to ensure proper entry into the vein lumen. A shallow angle, closer to 10 degrees, suits superficial veins on the dorsal hand, while deeper forearm veins may require angles closer to 30 degrees. Once you penetrate the skin, reduce the angle slightly and advance until you see a flashback of blood in the catheter chamber.
How Do You Confirm a Successful Flashback of Blood?
You confirm a successful flashback of blood by observing a visible return of blood in the catheter’s flash chamber immediately after the needle enters the vein lumen. This small chamber sits at the catheter hub and fills with blood when venous access is achieved. A brisk, steady flashback indicates correct intravascular placement. If the flashback is slow or absent, the needle may be partially outside the vein or pressed against the vessel wall. In that case, make a minor angle adjustment before advancing further. Never push the catheter forward without confirming flashback, as doing so risks infiltration or vessel damage.
How Do You Advance the Catheter and Remove the Needle?
You advance the catheter and remove the needle by first lowering the insertion angle after confirming flashback, then sliding the plastic catheter forward over the needle and into the vein. Use a smooth, controlled motion with your dominant hand while maintaining skin traction with the other. Once the catheter hub sits flush against the skin, apply gentle pressure over the vein just beyond the catheter tip, then withdraw the needle completely. Immediately activate the needle’s safety mechanism and dispose of it in a sharps container. Keeping pressure over the catheter tip during needle removal prevents blood from flowing back through the hub.
How Do You Secure the IV Catheter and Connect the Tubing?
You secure the IV catheter and connect the tubing by first placing a transparent semipermeable dressing over the insertion site, ensuring the catheter hub remains visible for monitoring. Attach the primed IV tubing or a saline lock to the catheter hub using a Luer-lock connection, then twist firmly until snug. Secure the tubing loop with medical tape to prevent accidental dislodgment. Document the insertion date, catheter gauge, and site location on the dressing or patient chart. A well-secured line reduces the risk of accidental removal and catheter migration during movement.
How Do You Set the Correct Drip Rate After Starting an IV?
You set the correct drip rate after starting an IV by referencing the provider’s prescribed infusion rate and calculating drops per minute based on the IV tubing’s drop factor. Gravity-fed tubing typically delivers 10, 15, or 20 drops per milliliter, while micro-drip sets deliver 60 drops per milliliter. The formula is: (volume in mL × drop factor) ÷ time in minutes. Adjust the roller clamp while counting drops in the drip chamber for 15 seconds, then multiply by four to verify accuracy. Recheck the rate periodically, as patient repositioning and tubing kinks can alter flow unexpectedly.
With an established line and verified drip rate, identifying the best anatomical vein sites strengthens future insertion success.
Where Are the Best Veins to Start an IV?
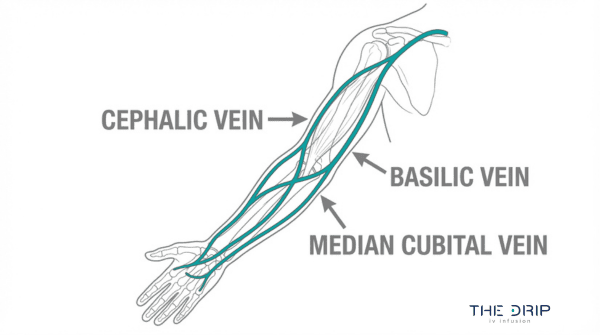
The best veins to start an IV include the median cubital, cephalic, basilic, dorsal hand, and forearm veins. Each site offers distinct advantages depending on therapy duration, patient anatomy, and clinical goals.
What Makes the Median Cubital Vein a Preferred IV Site?
The median cubital vein is a preferred IV site because of its large diameter, superficial position, and stability in the antecubital fossa. Most clinicians can palpate it easily, which makes it a reliable first choice for venipuncture and short-term infusions.
However, this vein sits directly over the elbow joint. According to NYSORA, the median cubital vein is a common site for venipuncture but is less ideal for long-term IV therapy because catheter patency is often compromised by joint movement. For extended infusions, sites below the antecubital fossa typically maintain better flow. Despite this limitation, the median cubital remains the go-to vein when quick, reliable access is the priority.
When Should You Use the Cephalic Vein for IV Access?
You should use the cephalic vein for IV access when longer infusion duration is expected or when the antecubital fossa is unavailable. The cephalic vein runs along the lateral (thumb) side of the forearm and upper arm, offering a long, accessible path that accommodates catheter placement away from joint flexion points.
This vein is particularly useful for patients receiving multi-hour IV therapy, since catheter movement is minimal compared to antecubital sites. Its superficial course along the radial aspect makes it visible and palpable in most adults. For patients needing repeated access, the cephalic vein’s length provides multiple potential insertion points along its path.
When Is the Basilic Vein Appropriate for IV Insertion?
The basilic vein is appropriate for IV insertion when other peripheral sites are inaccessible or when larger-bore catheter placement is needed. It runs along the ulnar (pinky) side of the forearm and courses toward the antecubital fossa, where it connects with branches from the cephalic vein.
Although the basilic vein offers a generous diameter, it sits deeper than the cephalic vein and tends to roll during cannulation. Anchoring the surrounding skin firmly before insertion helps stabilize it. Clinicians often reserve this vein for situations where more superficial options have been exhausted, making it a valuable backup rather than a first-line choice.
How Do You Start an IV in a Hand Vein?
You start an IV in a hand vein by targeting the dorsal metacarpal veins, which form a visible network across the back of the hand. These veins are superficial, easy to anchor, and well suited for short-term infusions or low-flow therapies.
Peripheral catheters ranging from 0.5 to 2.0 inches are commonly available, with shorter lengths preferred for these superficial hand veins. A 20- or 22-gauge catheter typically works best here. Because hand veins are smaller and more fragile than forearm veins, gentle technique and a shallow insertion angle are essential. Hand sites work well for brief treatments but may limit patient mobility and comfort during longer sessions.
When Should You Consider the Forearm for IV Placement?
You should consider the forearm for IV placement when therapy requires extended catheter dwell time, patient comfort during movement, and reliable flow rates. Forearm veins, including the accessory cephalic and median antebrachial veins, sit in a flat, stable area free from joint interference.
This stability makes forearm sites ideal for continuous infusions lasting several hours. Patients can bend their elbows and use their hands freely, which reduces frustration and accidental dislodgement. For practitioners prioritizing both catheter longevity and patient satisfaction, the forearm consistently delivers the best balance of accessibility and function.
Knowing where to place an IV sets the stage for handling situations where vein access proves challenging.
What Are the Best Tips for Starting a Difficult IV?
The best tips for starting a difficult IV include using warm compresses, anchoring rolling veins, relying on palpation over sight, and leveraging technology like vein finders or ultrasound. Each technique addresses a specific challenge.
How Do You Start an IV on a Dehydrated Patient?
You start an IV on a dehydrated patient by applying a tourniquet longer than usual, using gravity to engorge veins, and palpating rather than relying solely on visual cues. Lowering the arm below heart level encourages venous pooling when veins appear flat. A warm compress applied for three to five minutes promotes vasodilation in patients whose fluid deficit has collapsed superficial vessels. Smaller gauge catheters, such as a 22-gauge, often succeed where larger sizes fail because dehydrated veins are more fragile. Once access is established, isotonic crystalloid solutions restore intravascular volume effectively. Patience during site selection matters more than rushing multiple attempts, which can further damage compromised vasculature.
How Do You Find Veins on Patients With Dark Skin?
You find veins on patients with dark skin by prioritizing palpation over visual inspection. Veins that are difficult to see may still be easily felt as a bouncy, spongy cord beneath the surface when a tourniquet is applied. Running a fingertip along the forearm and dorsal hand identifies vein pathways even when skin pigmentation obscures the characteristic blue-green color. Adequate lighting angled across the skin can cast subtle shadows over vein contours. Near-infrared vein finders project a real-time vein map onto the skin surface, removing the dependence on visual contrast entirely. For clinicians who rely heavily on sight, shifting to a palpation-first approach is one of the most impactful technique adjustments available.
How Do You Start an IV on an Obese Patient?
You start an IV on an obese patient by targeting anatomical landmarks where subcutaneous fat is thinnest, such as the dorsal hand, the radial aspect of the wrist, and the forearm. A blood pressure cuff inflated slightly above venous pressure can serve as a more effective tourniquet than a standard elastic band on larger arms. Palpation is essential because veins may sit deeper than expected beneath adipose tissue. Using a longer catheter, typically 1.75 to 2.0 inches, ensures the cannula reaches the vein lumen through additional tissue depth. Ultrasound guidance becomes especially valuable in this population when surface landmarks are not palpable after standard techniques.
How Do You Access Rolling Veins During IV Insertion?
You access rolling veins during IV insertion by anchoring the vein with firm traction using your non-dominant thumb placed one to two inches below the intended puncture site. Pulling the skin taut in a distal direction stabilizes the vein against the underlying tissue, preventing lateral movement during needle entry. Approaching from the side of the vein rather than directly on top can also reduce rolling. A swift, confident insertion at a 10 to 15 degree angle minimizes the push force that displaces mobile veins. In my experience, hesitant or slow needle advancement is the primary reason rolling veins are missed; decisive technique solves the problem more reliably than any single piece of equipment.
How Can Warm Compresses Help Improve Vein Visibility?
Warm compresses help improve vein visibility by causing vasodilation, which increases the diameter of superficial veins and makes them easier to palpate and visualize. According to a study published in PubMed Central, heat application via a hot pack or warm compress is recommended for venous dilation prior to catheterization to enlarge venous diameter and improve success rates. Applying a warm, moist towel or a commercial heat pack to the target area for three to five minutes before tourniquet application produces noticeable engorgement. This technique is particularly useful for elderly patients, dehydrated individuals, and anyone with chronically small or deep veins where standard tourniquet application alone is insufficient.
When Should You Use a Vein Finder or Ultrasound?
You should use a vein finder or ultrasound after two failed attempts using traditional palpation and visualization techniques. Near-infrared vein finders project subcutaneous vein patterns onto the skin surface, helping clinicians identify viable targets without invasive exploration. Ultrasound-guided peripheral IV access provides real-time imaging of deeper veins that cannot be felt or seen. This technology is especially valuable for patients with obesity, edema, IV drug use history, or chronic illness that has scarred superficial vessels. Escalating to technology early, rather than repeatedly sticking a patient, reduces tissue trauma and preserves trust.
With difficult-access strategies established, understanding common insertion mistakes helps prevent complications altogether.
What Are Common Mistakes When Starting an IV?
Common mistakes when starting an IV include going through the vein, blowing the vein, forming a hematoma, and causing infiltration after insertion. Each error has distinct causes and prevention strategies.
What Happens If You Go Through the Vein?
Going through the vein occurs when the needle punctures both the anterior and posterior walls of the vessel, exiting the opposite side. This typically results from inserting the catheter at too steep an angle or advancing with too much force. Because the recommended catheter insertion angle is between 10 and 30 degrees with the bevel facing up, exceeding this range significantly increases the risk of through-and-through puncture.
When the posterior wall is breached, blood leaks into surrounding tissue, and the IV fluid cannot infuse properly. Practitioners should reduce their insertion angle once a flashback appears, then gently advance the catheter rather than the needle. In my experience, this single adjustment prevents most through-the-vein errors.
Why Does an IV Blow and How Can You Prevent It?
An IV blows when the vein wall ruptures during or shortly after catheter insertion, causing fluid to leak into surrounding tissue. Common causes include:
- Using a catheter gauge too large for the selected vein.
- Applying excessive pressure during insertion or flushing.
- Inserting into fragile veins weakened by age, medications, or repeated access.
- Failing to stabilize the vein with adequate traction before puncture.
According to clinical guidelines from Pedagogy Education, selecting the smallest gauge peripheral catheter that accommodates the prescribed therapy minimizes vein irritation and reduces blowout risk. Anchoring the vein with gentle distal traction before advancing the needle also helps prevent the vessel from shifting or collapsing under pressure.
How Do You Avoid Causing a Hematoma During IV Insertion?
You avoid causing a hematoma during IV insertion by applying proper technique at every stage. A hematoma forms when blood pools beneath the skin after a vein is punctured inadequately or a tourniquet is removed at the wrong time.
Key prevention steps include:
- Releasing the tourniquet before withdrawing the needle from the vein.
- Applying firm, direct pressure immediately after catheter removal.
- Avoiding repeated probing or redirection once the needle is under the skin.
- Selecting a vein that is well-anchored and visible rather than deep and mobile.
Patients on anticoagulant therapy or those with fragile vasculature require extra caution, as even minor technique lapses can produce significant bruising.
What Errors Lead to IV Infiltration After Insertion?
The errors that lead to IV infiltration after insertion involve catheter displacement, poor securement, and improper site selection. Infiltration occurs when IV fluid leaks from the vein into surrounding interstitial tissue.
According to a study cited by The Cardiology Advisor, infiltration accounts for approximately 16.3% of peripheral IV complications, making it one of the most frequent post-insertion issues. Contributing errors include:
- Inadequate dressing or tape allowing catheter movement.
- Placing the catheter near a joint where flexion dislodges it.
- Infusing at a rate that exceeds what the vein can tolerate.
- Failing to monitor the site regularly for swelling, coolness, or pain.
Routine site assessment and proper catheter securement are the most reliable safeguards against infiltration. Understanding these common insertion errors helps explain why professional IV administration matters.
What Complications Can Occur After Starting an IV?
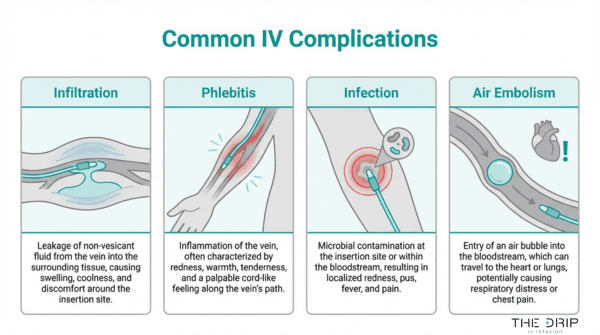
Complications that can occur after starting an IV include infiltration, phlebitis, infection, and air embolism. Each complication presents distinct warning signs and requires specific clinical interventions.
How Do You Recognize and Manage IV Infiltration?
You recognize IV infiltration by observing swelling, coolness, pallor, and tightness at the catheter site, which indicate that IV fluid has leaked into surrounding tissue. Pain or a burning sensation often accompanies these signs, particularly with vesicant medications. To manage infiltration, stop the infusion immediately, disconnect the tubing, and elevate the affected limb. Applying a warm or cold compress depends on the solution infused. Document the infiltration grade and notify the provider. For most patients, early detection prevents tissue damage, making frequent site assessments one of the simplest yet most overlooked safeguards in IV therapy.
What Are the Signs of Phlebitis From an IV?
The signs of phlebitis from an IV include pain, redness, warmth, and swelling along the vein path near the catheter site. A palpable venous cord may also develop as inflammation progresses. Clinicians use the Visual Infusion Phlebitis (VIP) scale, which scores severity from 0 to 5, with each grade identifying a progressively advanced state of inflammation (Delta Med). A VIP score of 2, indicating early-stage phlebitis with erythema and edema, requires resiting the cannula. Risk factors include large-gauge catheters, prolonged dwell time, and irritating infusates. Routine site assessment using the VIP scale catches phlebitis early before it escalates to thrombophlebitis.
How Do You Identify an IV-Related Infection?
You identify an IV-related infection by monitoring for localized signs such as erythema, purulent drainage, tenderness, and induration at the catheter insertion site. Systemic indicators include fever, chills, and elevated white blood cell counts without another identifiable source. Catheter-related bloodstream infections develop when bacteria migrate along the catheter into the bloodstream, making aseptic technique during insertion and maintenance critical. If infection is suspected, remove the catheter, culture the tip, and obtain blood cultures before initiating antimicrobial therapy. Strict hand hygiene and timely catheter replacement remain the most effective preventive measures against IV-related infections.
What Should You Do If a Patient Has an Air Embolism?
You should immediately clamp the IV line, place the patient in the left lateral decubitus position, and call for emergency assistance. This positioning, known as Durant’s maneuver, traps air in the right atrium and ventricle to minimize entry into the pulmonary circulation (Medscape). Applying Trendelenburg positioning further prevents air migration into the right ventricular outflow tract. Administer high-flow oxygen to accelerate nitrogen reabsorption. Symptoms of air embolism include sudden dyspnea, chest pain, hypotension, and a churning “mill wheel” heart murmur. Although rare with peripheral IVs, air embolism remains life-threatening; priming all IV tubing and removing air from syringes prevents this complication entirely.
With complications identified early, proper IV maintenance keeps therapy safe and effective.
Who Is Qualified to Start an IV?
Several categories of healthcare professionals are qualified to start an IV, though authorization varies by role, training, and state law. The sections below cover registered nurses, licensed practical nurses, paramedics and EMTs, and phlebotomists.
Can Registered Nurses Start an IV Independently?
Yes, registered nurses can start an IV independently in most clinical and mobile settings. IV insertion falls within the standard RN scope of practice across all 50 states, making registered nurses the most common professionals who perform peripheral venipuncture. RNs complete IV cannulation training during nursing school and refine the skill through clinical rotations. Competency requirements vary by employer, but most hospitals and infusion services require demonstrated proficiency before allowing independent IV starts. For practitioners just entering the field, building confidence takes time; first-attempt success rates for newly qualified nurses range from 44% to 76.9%, compared to 91% to 98% among experienced practitioners, according to a study published by the European Society of Medicine.
Are Licensed Practical Nurses Allowed to Start IVs?
Yes, licensed practical nurses are allowed to start IVs in many states, though authorization depends on specific state nurse practice acts. Some states permit LPNs to initiate peripheral IV lines after completing additional IV certification coursework. Other states restrict LPNs to monitoring existing IV infusions without starting new lines. In states where LPNs may initiate IVs, they typically must work under the direct supervision of a registered nurse, physician, or nurse practitioner. Because these regulations differ significantly from one jurisdiction to the next, any LPN seeking to perform IV insertion should verify current scope-of-practice rules through their state board of nursing before proceeding.
What IV Training Do Paramedics and EMTs Receive?
Paramedics and EMTs receive IV training that varies significantly based on certification level and state regulations. Paramedics complete extensive programs covering peripheral and intraosseous access, fluid resuscitation, and medication administration through IV lines. EMTs at the basic level typically do not receive IV initiation training, as their scope focuses on basic life support interventions. According to the National Highway Traffic Safety Administration, state governments in the United States hold the primary authority to issue EMS licenses and define the scope of practice for paramedics and EMTs regarding IV initiation. Advanced EMTs (AEMTs) occupy a middle tier, often authorized to start IVs and administer a limited set of fluids. This layered credentialing system means field providers should always confirm their state-specific authorization.
Can Phlebotomists Legally Start an IV Line?
No, phlebotomists cannot legally start an IV line in most jurisdictions. Phlebotomy certification trains professionals to perform venipuncture for blood draws, not for establishing intravenous access. IV catheter insertion requires maintaining a patent line, connecting fluid administration sets, and monitoring for complications, all of which fall outside standard phlebotomy training. Some states allow phlebotomists to perform venipuncture under supervision, but this authorization covers blood collection only. Facilities occasionally cross-train phlebotomists for IV starts through specialized competency programs, yet the legal authority to insert and maintain IV catheters still requires additional licensure or delegation from a supervising provider. For anyone considering IV therapy, confirming that a licensed professional performs the insertion remains essential.
How Do You Maintain and Monitor an IV After Insertion?
You maintain and monitor an IV after insertion by flushing the line regularly, replacing the catheter on schedule, and watching for signs that require restarting. These practices prevent complications and keep the infusion flowing safely.
How Often Should You Flush an IV Line?
You should flush an IV line every 8 to 12 hours when it is not in active use, and before and after each medication administration or fluid infusion. Flushing with a prefilled normal saline syringe clears residual medication, prevents clot formation inside the catheter lumen, and confirms line patency.
A standard flush involves pushing 3 to 5 mL of 0.9% sodium chloride through the line using a pulsatile (push-pause) technique. This turbulent flow is more effective at clearing the catheter interior than a single continuous push. If resistance is felt during flushing, the line should never be forced; resistance may indicate a partial occlusion or catheter malposition that needs clinical evaluation.
When Should an IV Catheter Be Replaced?
An IV catheter should be replaced every 72 to 96 hours for peripheral lines, according to standard clinical protocols, to reduce infection and phlebitis risk. Catheter dwell time directly correlates with complication rates. According to a study published by the American Academy of Pediatrics, statewide CLABSI rates declined by 40%, from 3.5 to 2.1 per 1,000 central-line days, following targeted prevention initiatives that included timely catheter replacement.
Immediate replacement is also warranted whenever signs of complications appear before the scheduled change, such as redness, swelling, or pain at the insertion site. Facilities that enforce strict replacement schedules consistently report fewer catheter-related bloodstream infections.
What Signs Indicate an IV Needs to Be Restarted?
The signs that indicate an IV needs to be restarted include:
- Infiltration: Swelling, coolness, or blanching around the insertion site, suggesting fluid is leaking into surrounding tissue.
- Phlebitis: Pain, redness, warmth, or a palpable cord along the vein, scored using the Visual Infusion Phlebitis (VIP) scale from 0 to 5 in ascending severity.
- Occlusion: Inability to flush the line or an infusion pump alarm signaling flow resistance.
- Dislodgement: A catheter that has migrated partially or fully out of the vein.
- Signs of infection: Purulent drainage, fever, or increasing tenderness at the site.
A VIP score of 2 or higher, indicating early-stage phlebitis with pain and erythema, requires immediate resiting of the catheter. Prompt recognition of these warning signs protects patient safety and ensures uninterrupted therapy. With proper monitoring established, professional IV services can streamline the entire process.
How Does Professional IV Therapy Simplify the Process?
Professional IV therapy simplifies the process by placing every clinical step in the hands of licensed, experienced nurses. The sections below cover why mobile nurse-administered infusions outperform DIY attempts and the key takeaways about how to start an IV.
Can Mobile Nurse-Administered IV Infusions Replace DIY Attempts?
Yes, mobile nurse-administered IV infusions can replace DIY attempts for most wellness and recovery needs. California law mandates that only licensed medical professionals, such as an RN under the supervision of a physician, PA, or NP, are authorized to administer IV therapy, according to a review by Nextech. Similar regulations exist across states, reinforcing that IV insertion requires clinical training, sterile technique, and proper vein assessment.
Attempting IV access without this expertise introduces risks:
- Incorrect catheter gauge selection can cause vein irritation or infiltration.
- Poor site preparation increases infection risk.
- Improper insertion angle leads to blown veins or hematomas.
- Unmonitored drip rates may cause fluid overload.
The Drip IV Infusion sends registered nurses directly to homes and workplaces, handling equipment selection, vein assessment, catheter insertion, and post-infusion monitoring. This eliminates every technical barrier that makes self-administered IVs dangerous for untrained individuals.
What Are the Key Takeaways About How to Start an IV?
The key takeaways about how to start an IV center on preparation, technique, and knowing when to seek professional help.
- Proper equipment, including the correct catheter gauge, antiseptic, tourniquet, and transparent dressing, forms the foundation of a safe IV start.
- Vein selection matters; the median cubital, cephalic, and basilic veins each serve different clinical scenarios.
- Insertion technique requires a 10 to 30 degree angle with bevel up, followed by flashback confirmation and smooth catheter advancement.
- Complications such as phlebitis, infiltration, and infection demand immediate recognition and response.
- Only qualified professionals, including RNs, paramedics, and certain LPNs, should perform IV insertion.
For anyone seeking IV hydration, vitamin infusions, or recovery support without the complexity, The Drip IV Infusion provides nurse-administered mobile IV therapy across Arizona, bringing clinical expertise directly to each client.